Grab your coffee, friend—we’re about to make Moxie payment plans as smooth as your morning latte.
If you’re a web designer who’s been putting off setting up payment plans in your Moxie CRM agreement templates because it feels like you need a PhD in rocket science to figure it out, I totally get it. But here’s the thing: once you know the system, it’s actually pretty brilliant.
Why Set Up Payment Plans in Agreement Templates?
Before we dive into the how-to, let’s talk about why this is such a game-changer for your web design business:
- Time-Saving Magic: Instead of manually creating payment plans for each client, your agreement templates do the heavy lifting automatically
- Professional Consistency: Every client gets the same polished experience, no matter how busy your week gets
- Cash Flow Control: You decide exactly when payments hit your account—no more chasing down invoices
- Multiple Options Ready: Create different agreement templates for 2-payment, 4-payment, or 6-payment plans
The Moxie Payment Plan Setup Process
Step 1: Create Your Agreement Template Variations
This is where the real magic happens, and honestly, it’s like having different outfits ready for different occasions. You’ll want to create separate agreement templates for each payment plan option:
- Web Design Agreement – 2 Payments
- Web Design Agreement – 4 Payments
- Web Design Agreement – 6 Payments
Why separate templates? Because editing payment plans each time is about as fun as watching Ross explain paleontology for the hundredth time. Trust me on this one. 😆
Step 2: Add Your Payment Plan Component
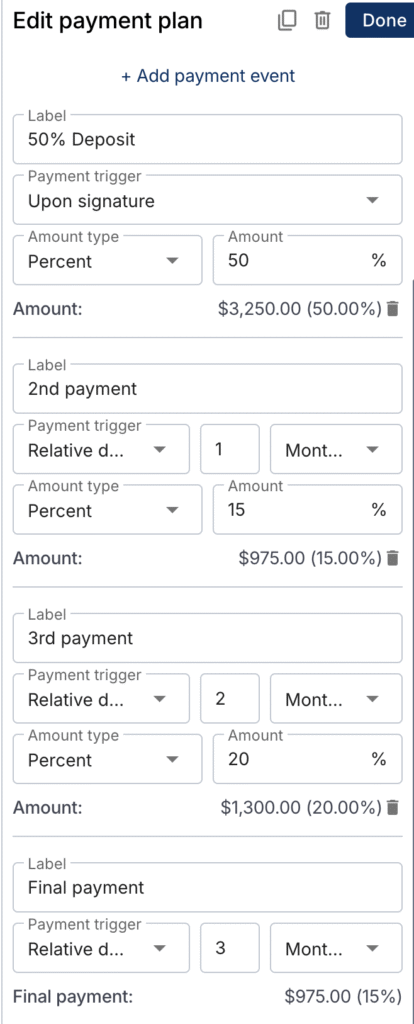
In your agreement template, you’ll add the payment plan component by clicking the plus sign. Here’s where it gets interesting. Moxie starts you with just a “Final Payment” option, but you’re going to build out your full plan.
Add the number of payments you want first
- 2, 3, 4, etc. then go through and add the specifics for each payment
Configure Payment Timing Options
You have two main timing options, and choosing the right one is crucial:
Relative Date: Payments automatically send based on timeline
- Deposit: Upon signature
- Subsequent payments: 1 month, 2 months, 3 months after project start
- No manual intervention needed
Milestone: Requires you to manually mark milestones complete
- More control but more work
- Easy to forget (and we’re all human)
- Can delay client payments
Step 3: Set Up Integrated Payments vs. Invoice Generation
Here’s where you decide how smooth you want this process to be:
With Integrated Payments:
- Client pays deposit immediately when signing agreement
- Super smooth client experience
- Make sure “Review invoice before sending” is toggled OFF
Without Integrated Payments:
- Moxie generates deposit invoice automatically
- You can review before sending (if toggle is ON)
- Client receives invoice separately from agreement
What Happens When Your Client Signs
Once your client submits their signed agreement, Moxie becomes your personal assistant:
✓ Project Created: Complete with all your template tasks
✓ Payment Plan Activated: All future payments scheduled automatically
✓ Deposit Invoice Generated: Ready to send or automatically sent
✓ Timeline Starts: Countdown begins for subsequent payments
The system even sends automatic payment reminders 5 days before each due date. It’s like having Monica’s organizational skills without the color-coded labels everywhere. 👏🏼
Moxie Payment Plan Best Practices
- Name Your Invoices Properly: Change the invoice description from the agreement name to something client-friendly like “Web Design Project – 50% Deposit”
- Keep Payment Schedules Realistic: Don’t squeeze payments too close together—give yourself breathing room
- Test Your Setup: Send yourself a test agreement to make sure everything flows correctly
- Organize Your Templates: Use clear naming conventions so you can quickly grab the right payment plan
Common Payment Plan Pitfalls (And How to Avoid Them)
- The Math Mistake: Double-check your percentages add up to 100%. Nothing says “professional” like a payment plan that adds up to 137%.
- Forgetting to Rename: Your client doesn’t need an invoice titled “Web Design Agreement Template #4 Copy”
- Milestone Confusion: If you choose milestone payments, remember you have to manually trigger them. Relative dates are usually your friend.
- Integration Settings Mismatch: Make sure your payment integration settings match your invoice preferences
Making Payment Plans Work for Your Business
The real beauty of Moxie payment plans isn’t just the automation—it’s the flexibility. You can create templates for:
- Quick Turnaround Projects: 50% deposit, 50% on completion
- Standard Builds: 4-payment plan spread over 3 months
- Large Projects: 6-payment plan for extended timelines
- Rush Jobs: Front-loaded payments to secure priority
The Bottom Line
Setting up payment plans in Moxie agreement templates might feel overwhelming at first, but once you’ve got your system dialed in, it’s like having a personal finance manager who never calls in sick.
Your clients get a professional experience with clear payment expectations, and you get predictable cash flow without chasing invoices. That’s what I call a win-win situation.
Need help setting up your Moxie workspace from start to finish? Check out The Moxie Maven Academy for step-by-step guidance that makes sense.