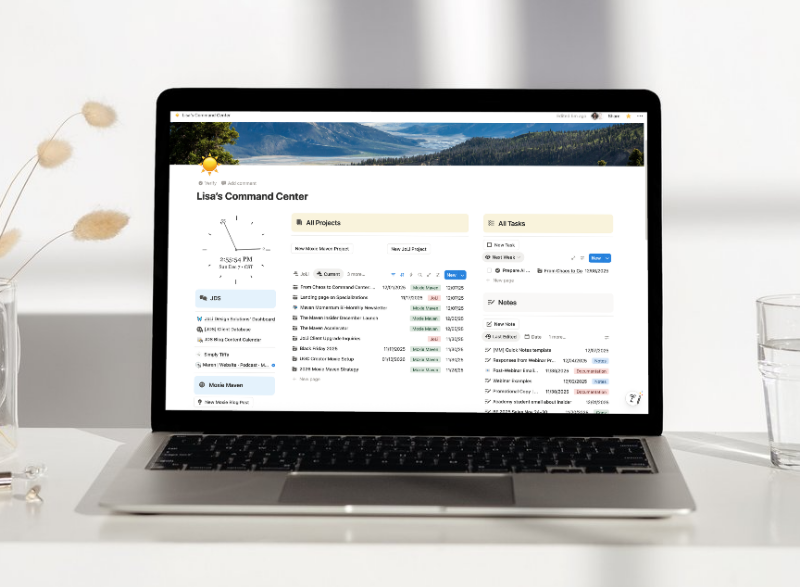
Workflow automation has the potential to revolutionize your business operations when implemented thoughtfully and systematically. While the allure of immediately diving into automation tools and setting up complex workflows might be tempting, proceeding without establishing proper groundwork can result in inefficiencies, confusion, and operational bottlenecks that could potentially harm your business processes rather than enhance them.
In this article I’ll walk you through the essential steps and strategic considerations necessary to master workflow automation, providing you with the knowledge and framework needed to create a streamlined, efficient, and sustainable automated business ecosystem that truly delivers results.
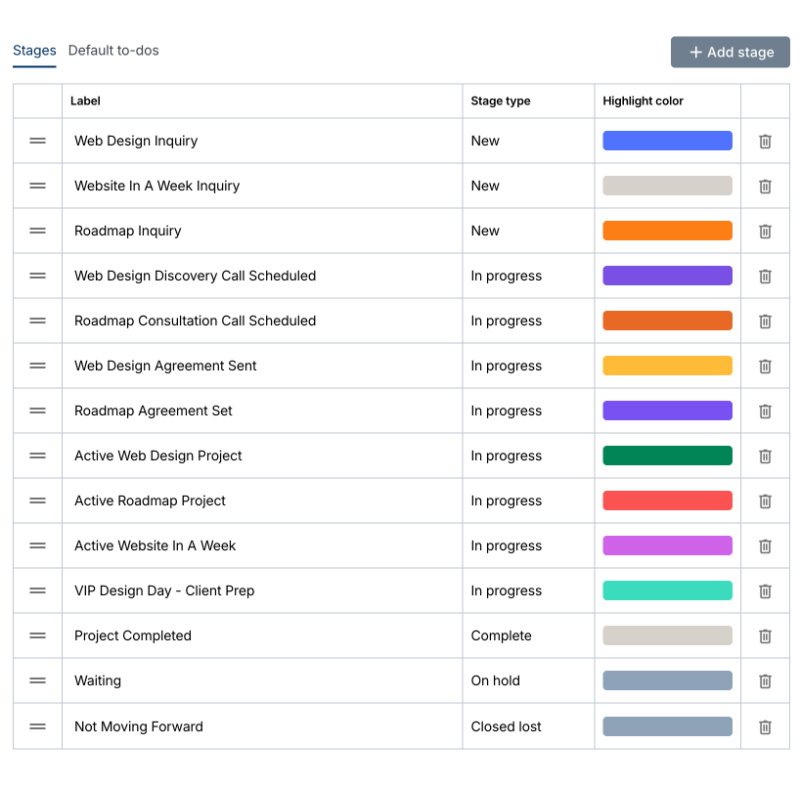
Setting Up Pipeline Stages: The Foundation of Automation
Before we get into the nitty-gritty of workflow automation, you need to lay down a strong foundation. The very first step is to set up your pipeline stages. Think of your pipeline stages as the roadmap for your client or prospective lead journey.
- Inquiry Stage: This is where a lead first shows interest in your services.
- Follow-Up Stage: Engaging with the lead to gauge their potential.
- Negotiation Stage: Serious discussions about terms and services.
- Agreement Stage: When a client agrees to the terms and a contract is sent.
- Project Execution Stage: Doing the actual work you’re contracted to do.
- Completion Stage: Wrapping up the project and discussing potential future collaborations.
Having these stages in place helps trigger specific actions in your automation processes. Every step leads the client closer to becoming an active participant in your business relationship.
Essential Templates: Email, Agreements, and Forms
Next up, you need to have your email templates, agreement templates, and forms ready for automation. Trust me, having these templates prepared will save you a ton of time and keep your messaging consistent.
Why You Need Email Templates:
- Consistency: Ensures that your communication is professional and consistent across the board.
- Efficiency: Saves time; no need to draft emails from scratch every time.
- Customization: While templates are standardized, you can still customize key details to tailor the communication to individual clients.
Agreement Templates:
- Service Agreements: Cover the most common types of agreements your business engages in.
- Special Agreements: For those unique projects with specific requirements.
Examples of Forms to Include:
- Client Inquiry Form: To gather preliminary information when a lead first comes in.
- Strategy Questionnaire: Detailed form to outline the project requirements.
- Feedback Form: To collect client feedback upon project completion.
Having these templates ensures that your workflow automation can send out the right documents at the right time, keeping the process smooth and professional.
Grab my email templates HERE. This is a Notion page that you can duplicate if you want
Dive into Workflow Automation: Adding Workflows
Once your foundational items are ready, it’s time to dive into the automation itself. In Moxie, you can start adding workflows by going to the automation section. Here’s a step-by-step on how to do this:
- Create a New Workflow: Click on the “Add Workflow” button. Give it a specific name that identifies what this workflow will do.
- Specify the Trigger Stage: Choose the pipeline stage that will trigger this workflow.
- Design the Workflow: Use the available modules to define actions—sending emails, waiting for responses, updating stages, etc.
For example, let’s say you’re setting up an automation for when an agreement is sent. When a client reaches the “Agreement Sent” stage, this triggers a series of automated actions such as:
- Finalizing the Deal: Once the agreement is signed, the client is moved to the next pipeline stage, and subsequent actions (e.g., sending a questionnaire) are triggered.
- Sending a Confirmation Email: An email with a confirmation and next steps is sent to the client.
- Waiting for Agreement Signing: The workflow waits for the client to sign the agreement.
Key Components: Waiting and Decision Modules
In workflow automation, waiting and decision modules are pivotal.
Waiting for Conditions:
- Wait Until Signed: You can set the automation to wait until an agreement is fully executed.
- Wait for Submission: Similarly, the system can wait until a form is submitted by the client.
Decision Making:
- Is Agreement Signed: The system checks if the agreement is signed before moving to the next action.
- Is Form Submitted: It verifies if the submitted form contains the required information.
- Invoice Paid: Checking if an invoice sent has been paid before moving forward with the project.
These modules make your workflow dynamic and responsive, ensuring actions happen only when certain conditions are met. This keeps the process logical and prevents premature actions.
Practical Tips: Keeping Your Workflow Concise
One of the most valuable lessons I can share is to keep your workflows concise. Overloading a workflow with too many actions can make it complicated and difficult to manage.
Pro Tips for Concise Workflows:
- Focus on One Stage at a Time: Each workflow should ideally move the client from one stage to another.
- Avoid Overcomplicating Steps: Stick to essential actions within each workflow. For example, the primary goal might be to ensure a client signs an agreement and fills out a strategy questionnaire.
- Set Clear Triggers and Outcomes: Define clear start points (triggers) and end goals (outcomes) for each workflow.
Fine-Tuning Your Automation Process
The journey to mastering workflow automation involves setting up a solid foundation with pipeline stages and essential templates. From there, designing and fine-tuning your workflows with waiting and decision modules ensures each action is timely and relevant.
Remember, automation isn’t just about efficiency—it’s also about enhancing the client experience. With every step automated, you’re reducing the chances of human error and ensuring a smoother, more professional process for your clients.
Take the time to prepare your stages and templates, and approach each workflow with clarity and purpose. This way, you’ll not only save time but also offer an improved, consistent experience for your clients.
The Moxie Maven Academy
Key Steps to Creating a Workflow Automation
Preparation
- Ensure all necessary components are in place before setting up workflows:
- Confirm email templates are created and ready for use.
- Set up any required forms that will be included in the workflows.
- Verify pipeline settings and stages that will trigger workflows.
Access Workflow Automations
- Navigate to the automation section in your workflow management tool (usually found in the left navigation panel).
Create a New Workflow
- Click on “Add Workflow.”
- Name the workflow clearly and specifically to reflect its purpose.
Define Trigger Stage
- Select the initial stage that will trigger the workflow. This could be an inquiry, agreement sent, etc.
Add Modules to Workflow
Drag and drop necessary modules (e.g., email send, wait for, decision) into the workflow:
- Email Send: Configure the email template to be sent automatically.
- Wait For: Set a wait period (e.g., 1 day, 2 days) for specific actions (e.g., scheduling a meeting).
- Decision: Create decision points based on conditions (e.g., “Is the meeting scheduled?”).
Set Up Actions Based on Decisions
- Define actions that follow the decision points:
- If the decision is “Yes,” proceed to the next stage or action.
- If “No,” send a reminder email or take an alternative action.
Finalize and Save the Workflow
- Review the entire workflow for accuracy.
- Save the workflow and publish it if ready. If still in draft mode, it can be tested or modified later.