The million-dollar question every Moxie user asks: “Where do my tasks show up in the client portal, and why aren’t some things visible?”
If you’ve ever moved a task to “Client Approval Needed” only to have your client say they can’t see it, or wondered why some assigned tasks appear while others don’t—this guide is for you.
Tasks and subtasks in Moxie CRM follow specific rules that, once you understand them, make perfect sense. But until you do? It can feel like you’re playing a guessing game with your client’s experience.
Let’s break down exactly how this works, step by step.
The Two Key Factors That Control Task Visibility
Everything about task visibility in your client portal comes down to two main settings:
- Your project type settings (specifically, your task statuses)
- Your project portal access level (full collaboration vs. read-only)
Think of these as the “master controls” for your entire client portal experience. Get these right, and everything else falls into place.
Understanding Project Types and Task Statuses
Your project types are where the magic happens. Each project type has task statuses that you can toggle as “client actions”—and this is crucial for portal visibility.
Client Action vs. No Client Action
When you set up your task statuses, you’ll see an option for “Client Action.” Here’s what this actually does:
- Client Action ON: When you move a task to this status, your client gets an email notification AND the task appears in their portal
- Client Action OFF: No automatic email is sent when you move tasks to this status
The Buffer Status Rule
Here’s something I learned the hard way: you need a buffer status between consecutive client action statuses.
If you have “Client Approval Needed” (client action ON) directly followed by “Client Task To Do” (client action ON), your clients will get double notifications and the statuses will chain together unexpectedly.
Instead, add a buffer like “Waiting on Client” or “Internal Review” between them. Trust me on this one—save yourself the headache.
The Four Ways Tasks Can Show Up in Client Portals
Based on my experience and testing with our friend Rachel Green (yes, that Rachel Green), here are the four scenarios for task visibility:
Scenario 1: Status-Based Tasks (Recommended)
- Move task to a status with “Client Action” enabled
- Client gets email notification
- Task appears in portal immediately
- No assignment required
Scenario 2: Assigned Tasks Only
- Assign task directly to client
- Change no status
- Task appears in “Tasks” tab
- More hidden, less obvious to clients
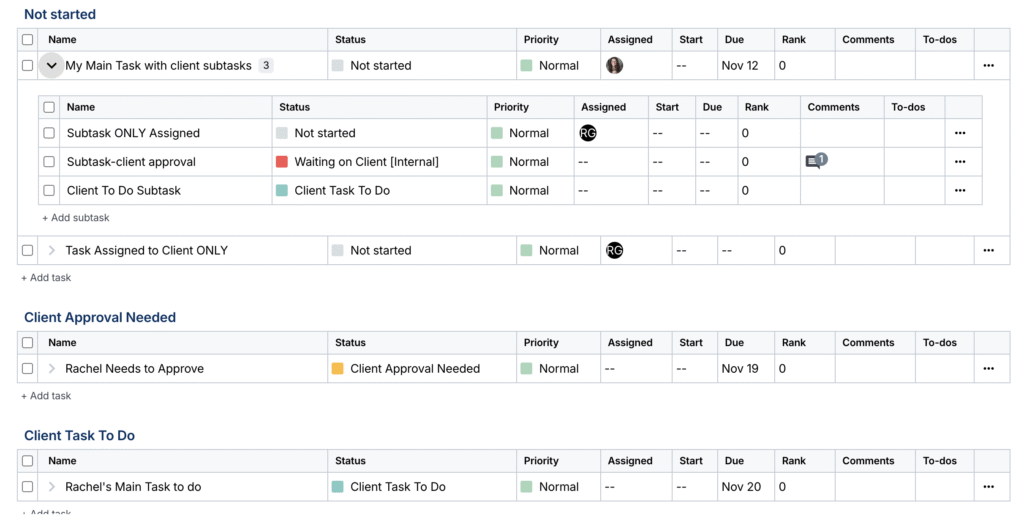
Scenario 3: Main Tasks with Client Subtasks
- Main task assigned to you
- Subtasks assigned to client
- The main task becomes visible because of the client subtasks underneath
- This can be confusing but it’s how Moxie works
Scenario 4: Internal Tasks Only
- Task assigned to you with no client subtasks
- No status change to client action status
- Remains completely hidden from client portal
Project Portal Access: Full Collaboration vs. Read-Only
Your project portal access setting determines what clients can actually do with visible tasks:
Full Project Collaboration
- Clients can move task statuses
- They can mark tasks complete
- They can add notes and descriptions
- Recommended for active client participation
Read-Only
- Clients can see assigned tasks
- They can only click “OK” on tasks
- Limited interaction capability
- Better for clients who just need visibility
The Step-by-Step Process for Client Task Management
Here’s your action plan for setting up client tasks that actually work:
Step 1: Set Up Your Project Type
- Go to Project Types
- Configure task statuses for client communication:
- “Client Approval Needed” (Client Action: ON)
- “Waiting on Client” (Client Action: OFF) ← Your buffer
- “Client Task To Do” (Client Action: ON → or you can skip this status and assign ANY task to the client no matter what status the task is in)
Step 2: Choose Your Portal Access
- Navigate to project settings
- Set “Project Portal Access” to “Full Project Collaboration” for interactive clients
- Use “Read-Only” for passive updates only
Step 3: Create Client-Facing Tasks
For maximum clarity, do this:
- Create a clear main task title (like “Rachel’s Main Task To Do”)
- Move it directly to “Client Task To Do” status
- Do not assign it—the status change handles everything
Step 4: Test with a Real Client Portal View
This is critical: log in as your actual client to test, don’t just use the “View Portal As” feature. There are subtle differences in what you’ll see versus what they see.
Common Issues and How to Fix Them
“My client says they can’t see the task!”
- Check if the task status has “Client Action” enabled
- Verify your project portal access isn’t set to “Overview Not Visible”
- Make sure you moved the task to the status (don’t just assign it)
“The task disappeared after they completed it!”
- Completed tasks move out of the active view
- This is normal behavior—completed tasks are archived
“They’re getting too many emails!”
- You probably have client action enabled on consecutive statuses
- Add buffer statuses between client action statuses
- Or use assignment instead of status changes for some tasks
“Main tasks are showing up when they shouldn’t!”
- Check for client-assigned subtasks underneath
- Main tasks become visible if they contain client subtasks
- Split these into separate main tasks if needed
Pro Tips for Smooth Client Portal Management
Create Client-Specific Main Tasks
Instead of trying to manage subtasks under your internal tasks, create dedicated main tasks that are clearly client-facing. Name them obviously: “Sarah’s Approval Tasks” or “Content Review for Client.”
Use Descriptive Status Names
Don’t just use “To Do”—use “Client Approval Needed” or “Waiting for Your Review.” Clear status names help both you and your client understand what’s happening.
Set Up Email Templates
Since status changes trigger emails, make sure your notification emails are helpful and branded. These become part of your client experience.
Test Everything with Your Fake Client
Create a test client using your own email address and run through your entire project workflow. You’ll catch issues before real clients do.
The Bottom Line: Keep It Simple
The more complex you make your task statuses, the more likely something will break or confuse your clients. Stick to the essentials first
- Not Started
- In Progress
- Client Approval Needed
- Waiting on Client (buffer)
- Client Task To Do
- Completed
Remember: your client portal should make their life easier, not more complicated. When in doubt, test with your actual client login and see what they see.
Your Next Steps
- Audit your current project types—do your client action statuses make sense?
- Add buffer statuses if you have consecutive client action statuses
- Test your client portal by logging in as a real client
- Document your process so you can train team members consistently
Once you nail this system, client portal management becomes automatic. Your clients will know exactly what they need to do and when, and you’ll spend way less time answering “Where do I find that task?” questions.
Could client portals BE any more organized? (Sorry, I had to. 😆)
Questions about your specific setup? Book a Maven Hotline call. I love helping fellow Moxie users get their client portals running smoothly. Because when your systems work, your business works.