Hey, hey! It’s Lisa here, ready to guide you through an essential tool that can revolutionize how you connect with your clients: the the Moxie CRM Meeting Scheduler. If you’re juggling multiple client calls, feeling overwhelmed, or are seeking ways to streamline your workflow, then buckle up.
Today, I’m breaking down everything you need to know about setting up meeting schedulers for efficient client communication.
The Foundation: Connecting Your Calendar
Let’s start with the basics—before diving into the specifics of setting up your meeting scheduler, you need to ensure your calendar, be it Apple, Microsoft, or Google, is connected. Why? Because linking your calendar is the backbone of effective scheduling. It ensures no double bookings or calendar conflicts, giving you a clear view of your available slots.
Go to Workspace Settings (bottom left corner) > Integrations and connect your calendar.
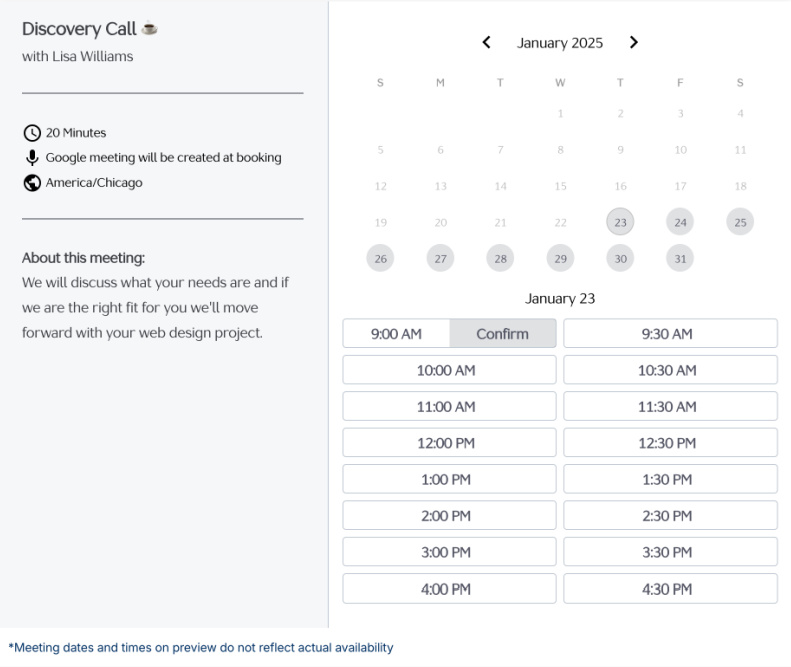
Creating Your First Scheduler: The Discovery Call
Now, let’s get our hands dirty. Your first scheduler sets the stage for every subsequent meeting you book. Here’s how you can nail it:
- Set the Duration: Determine how long you’d like the meeting to last. For discovery calls, I recommend keeping it short and sweet—around 20 minutes works wonders.
- Connect the Meeting Tool: Select your preferred video conference tool, like Google Meet, for seamless integration.
- Write a Clear Description: Keep it concise. The description should be short and to the point since it shows on the left-hand side of the scheduling page.
- Add Attendees: If you’re working with a team, you can include additional attendees right from the scheduler.
- Check Your Availability: Ensure your scheduler checks against your connected calendar to avoid any conflicts.
Alright, you’ve entered your details, styled your scheduler to match your brand, and now you can duplicate this first creation to streamline other types of meetings.
The Devil in the Details: Customizing Your Scheduler
Customizing your scheduler is like putting on a suit that fits perfectly. It’s all about the details! Here are the essential things you should fine-tune:
- Availability Settings: Whether it’s a discovery call or a quarterly review, adjusting the times you’re available is crucial. If you set your availability in blocks, you can manage back-to-back meetings without feeling drained.
- Advanced Options: Customize how many days ahead clients can book, buffer times between meetings, and allow rescheduling options.
- Question Forms: Adding a custom question form can gather essential information before the meeting. It could be anything from basic details like first name and email to specific questions like the purpose of the meeting. Ensure these fields are mapped correctly to make the data collection effortless.
Efficiency Tips: Key Settings to Optimize
You’re doing great! Now, let’s add some pro tips to keep things efficient:
Key Settings to Focus On:
- Pipeline Settings: Watch out for the “Add Meeting to Pipeline” option. Use this only when the call actually leads to new opportunities, such as initial discovery calls. For regular client meetings, disable this to avoid creating unnecessary entries.
- Notifications and Reminders: Set up automatic reminders to keep both you and your client on the same page. Whether it’s an email reminder a day before or a calendar notification an hour before, these small touches can keep things smooth.
Unique Scheduler Types: Exploring Different Use-Cases
Not all meetings are created equal! Depending on the type of client calls you handle, here’s how I use different schedulers effectively:
- Quarterly Strategy Calls:
- Set specific availability for a certain period.
- Notify clients well in advance.
- Gather focused questions in the form.
- Office Hour (Paid Sessions):
- Integrate a payment gateway to charge for the session.
- Clearly specify terms in the description.
- Provide detailed questions to understand the client’s needs.
- Kickoff Calls:
- Use the default settings for basic scheduling.
- Ensure it does not create another pipeline entry.
- Align with your workflow automation to seamlessly integrate it into the project initiation process.
Mastering the Client Portal: Keeping Everything in One Place
If your clients can book, view, and manage their meetings from a single online portal, you’re golden. Here’s how to maximize the client portal:
- Integrate Schedulers into Client Portal: Display all relevant schedulers that clients can use, such as strategy calls or office hours.
- Enable Meeting Features: Allow clients to see their booked meetings and history.
- Provide Seamless Access: Ensure the client has easy access to all their information, including forms and schedules, to enhance their user experience.
Styling Your Scheduler: Making It Look Professional
Your scheduler should reflect your brand. It’s not just about functionality—it’s also about presentation. Take the time to adjust fonts, colors, and logos. A well-styled scheduler gives clients a sense of professionalism and assurance.
Styling Tips:
- Choose Brand Colors: Apply your brand’s color palette to the scheduler to create a cohesive look.
- Logo Display: Consider whether you want your logo to be displayed, especially if the scheduler is embedded on your website.
- Font Selections: Choose fonts that align with your brand’s identity. It’s a subtle but powerful way to communicate your brand’s voice.
Let’s face it—these details might seem small, but they add up to big impressions. It’s these consistent touches across the board that make your client communication seamless and your services dependable.
The Power Move: Duplicating Your Scheduler
Once you’ve forged your first scheduler to perfection, here’s the power move: duplicate it. Adjust settings for different purposes without having to recreate the wheel. For example:
- Discovery Call Scheduler: Use as a base for all initial client interactions.
- Consultation Scheduler: Adjust duration and form fields to cater to paid consultations.
- Client Meetings Scheduler: Modify for recurring client check-ins without adding to pipeline stages.
Final Thoughts: Taking Charge of Your Schedule
Mastering meeting schedulers is not just about managing your time—it’s about taking full control of your client relationships. When you set up these tools efficiently, you free up mental energy to focus on what really matters: delivering top-notch services and building meaningful connections with your clients.
Remember, your time is valuable. The more streamlined and efficient your scheduling system, the more time you have for your genius work.